Monday, February 28, 2011

My First 5K

I’m running my first ever 5K (3.1 miles) this Saturday! My cousin, Lisa, has been running half marathons now for a few years and really enjoys them. Her sisters, Joanne & Karen, are running a half marathon in Dallas with her at the end of March. There’s no way I’d be ready for that!

Lisa & Karen talked about running this 5K and asked if I would like to sign up and run, too. Sure! I had been running just for exercise, but actually having a goal to work toward has really been motivating.

I’ve been running 3.2 miles at least three times a week for the last few weeks. I’ve been using a popular walk/run method where I run for 3 minutes and walk for 1 minute. I’m pretty sure this method is the reason I’m not completely burned out!

I have two more 3+ mile runs to get under my belt this week and then I’ll be ready for my first “race”! My goal is to run it in under 30 minutes…I have about 2 minutes to shave off my time this week, but I think I can do it!

Looking forward to the run!!

Friday, February 25, 2011

Yard Work

Spring is here and we have a long to do list to get the garden ready!

IMG_7915_Resized

Most of my tomatoes are still in the greenhouse, but we have three little “patio” tomatoes at home. Travis laughed and asked why we needed tomatoes at the house when we’ll have close to 200 of them in the garden! Well, I figured that these would be fun for Elizabeth to “help” take care of. And then she can pick them, too!

IMG_7919_Resized

I have increased my herb population based on what I’ve seen do well here. Thyme has been one of those things that hasn’t done great in the flower bed, but I’m hoping that it’ll do much better in a container.

IMG_7921_Resized

I’ve cleaned out the herb bed and planted new transplants that I grew from seed.

IMG_7922_Resized

Chives/green onion.

IMG_7923_Resized

Cilantro.

IMG_7925_Resized

Curly leaf parsley.

IMG_7926_Resized

I’ve cut back part of the mint bush and cleaned out the day lilies.

IMG_7927_Resized

I even found some new little lily babies!

IMG_7928_Resized

Oregano.

IMG_7929_Resized

And rose cuttings Stephen collected for me!

IMG_7933_Resized

My paper whites are really looking good and they don’t show signs of slowing, yet!

IMG_7936_Resized

Travis cleaned out my washing machine drain and dug a better ditch!

IMG_7937_Resized

He actually did a ton of dirt moving last weekend while Elizabeth & I were out of town. There was a big pile of dirt to the right of Elizabeth, but now it’s along one of our fences, guiding the neighbors’ runoff water away from the garden.

IMG_7938_Resized

We also dug up loads and loads and loads of bricks…most had been covered with grass. Travis filled in the holes with soil an we planted St. Augustinegrass from the washer drain ditch into the newly fixed holes. It looks much better!

There’s a lot of stuff going on around here and this was just a small glimpse into all of the projects we’ve been working on!

Monday, February 14, 2011

Happy Valentine’s Day!

Nothing says “I Love You” around here like chocolate covered strawberries and pretzels! (Or really, chocolate covered anything!)

IMG_7879_Resized

I hope you and the special people in your life have a very Happy Valentine’s Day!

IMG_7884_Resized

Elizabeth was kind enough to pose with a chocolate covered pretzel…right before she ate it and nearly all of the other ones I made!

IMG_7876_Resized

This photo really has nothing to do with Valentine’s day. We started a batch of grapefruit wine last night and she was helping me chop up raisins to go into the mix. She just smiled and posed so nicely, I figured you’d like it, too!

Monday, January 17, 2011

Menu Plan Monday

After days of cloudy skies and rain, we finally have sunshine again! The sun has motivated me to get my cleaning finished inside of the house so that I can spend at least some time outside.

Here’s what’s on the menu this week:

  • Steak, grilled; Baked potatoes; Corn; Salad
  • Stir-fry, beef; Rice
  • Chicken breasts (cooked how??); Pasta; Frozen Green Beans
  • Beef Soup
  • Roast; Mashed potatoes; Gravy; Carrots; Salad

We have wedding commitments for both Friday night and Saturday afternoon/evening. So, while this week will be a busy one, at least two meals are taken care of!

I hope y’all have a great week!

Friday, January 14, 2011

Ribs, in the Crock Pot

These ribs have been in my recipe box for some time now. They’re one of my favorite busy-night meals, too. My aunt, Monica, made these ribs for one Sunday get-together and I’ve loved them ever since. She even makes her own barbeque sauce, but I haven’t perfected that…yet!

IMG_7560_Resized

You’ll need ribs, your seasoning of choice, vegetable oil, and a little water. I recommend using baby back or short ribs. Spare ribs are good for barbequeing, but they’re really too fatty for the crock pot. The seasoning I used is just a Rib & Brisket Rub from a local packing house.

IMG_7561_Resized

Unwrap the ribs and place on a large pan to catch the mess.

IMG_7562_Resized

Pour on a little vegetable oil.

IMG_7565_Resized

Shake on some seasoning.

IMG_7568_Resized

And rub it all in.

IMG_7569_Resized

Flip it over.

IMG_7570_Resized

And repeat.

IMG_7571_Resized

Cut into sections of two to three ribs.

IMG_7573_Resized

I ended up with six sections. Which is enough for our family, but if you have big eaters, you may want to use two slabs of ribs.

IMG_7574_Resized

Throw them in the pot and add about a half inch of water in to help them get started.

IMG_7580_Resized

Find yourself a pretty little helper to push the buttons.

IMG_7581_Resized

Cook the ribs on high for six hours or on low for eight. Ten hours is just too long and the meat will completely fall off of the bone.

IMG_7605_Resized

This is after three hours of cooking.

IMG_7608_Resized

And this is after six hours.

IMG_7615_Resized

Serve them up with your favorite sides and enjoy!

This is a great quick, easy meal for a busy night! Try it soon!

Thursday, January 13, 2011

Front Entry Remodel

Back in November, Travis & I ordered a new front door for our house. Here are a few pictures from the remodel.

A_Resized

This is what the front entry looked like on the day we bought our house. We quickly removed the wrought iron which opened the entry up right away. We knew it would be awhile before we could get to replacing the front door, but we could live with this for now.

B_Resized

Inside was a built-in planter box. This was the first thing we demolished in the house.

C_Resized

What we didn’t know, was that the slab was counter sunk in this area to accommodate the terrazzo tile and the planter box. As I was chipping the tile out, the “concrete” under the tile sounded very hollow. After a few more swings of the hammer, Travis & I discovered that the concrete was not part of the slab of the house and all of it had to be removed.

D_Resized

That left us with a huge hole in the slab roughly 8 feet long, 4 feet wide, and 3 inches deep. It all had to be filled in and level with the existing slab.

E_Resized

Before we could pour new concrete, we had to remove the old front door and side light. Of course, it’s December and cold, so we put plywood up and screwed it to the house to keep out most of the cold. This also gave us room to work.

The footing the old front door was on was also not connected to the existing slab and Travis could move it with his hand, so we also tore that out.
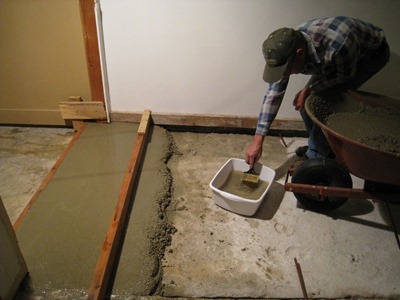
F_Resized

We started pouring concrete around 10 p.m. Travis’ dad came over to help, thankfully, because we could not have gotten it done without him! Here, dad is wetting the existing, sunken slab with water to help the new concrete adhere to the old. He also painted full strength cement on the vertical sides to help the new concrete bond to the old.

G_Resized

Travis poured the first two wheelbarrows full, then he took over the troweling, while his dad & I mixed concrete. It took just under 20 bags of concrete to fill this hole.

H_Resized

I_Resized

J_Resized

After the concrete had set, it had to be covered for five days to cure. We could walk on it the next day, so we left it as covered as possible and got to work installing the new door and side light.

K_Resized

Even Elizabeth helped!

L_Resized

Travis also moved the old switches around the corner so that the interior entry, exterior entry, and exterior flood lights were all together on the same wall.

M_Resized

So…This is before…

N_Resized

And this is after!  We removed all of the plywood from the entry (except for the ceiling) and replaced it with new, grooved cedar. We also put in cedar to trim the door. Travis took down the light fixture, cleaned the glass and painted the frame black. We replaced the doorbell and put a new cover on the outlet. After a couple of coats of “Caribbean Walk” paint, the exterior entry is complete!

O_Resized

This is how the front door looks from inside of the house. We have not trimmed it yet, because we are trying to decide what type of trim to go with in this part of the house and we have three exterior doors that we would like trimmed the same.

Also, this door and side light are stainable textured fiberglass. It has a wood grain texture. This is not the final color of the door. We needed to get the exterior painted before we picked out a stain color. We’re thinking something brown with no red in it. I may wait until spring to take the door off and stain it so I’ll have nicer weather. It’s just too cold now to live without a front door for a week!

Wednesday, January 12, 2011

Rocking Chair

About a year ago, Travis bought me a rocking chair. I’d had been asking for one for a long time and knew that I wanted one from a “naked” furniture shop. I never took a picture of just the rocking chair by itself, but you can see what it looked like in the picture.

IMG_4425_Resized

The store we bought it from will stain the chair for you for an additional fee, but since we no longer lived in that town, we just bought the cans of stain and urethane, all the while saying that I could just stain it myself.

Fast forward 12 months and I have finally stained my rocking chair. I am so pleased with how it turned out.

IMG_7600_Resized

Two coats of stain and three coats of urethane later, it’s finally ready to be “really” used! I actually liked the way it turned out so much that I’ve started sanding down an old chair that my mom gave Elizabeth. It was stained before, but it has now faded and the protective clear coat has been peeling for some time.

I’ll have to take pictures of the next project now that I have a small handle on what I’m doing! More than anything, I’m just happy to have one more project checked off of my list!